
$69.90
Free delivery · 7–14 days
Palm Candlestick Holder for Gothic Halloween Decor


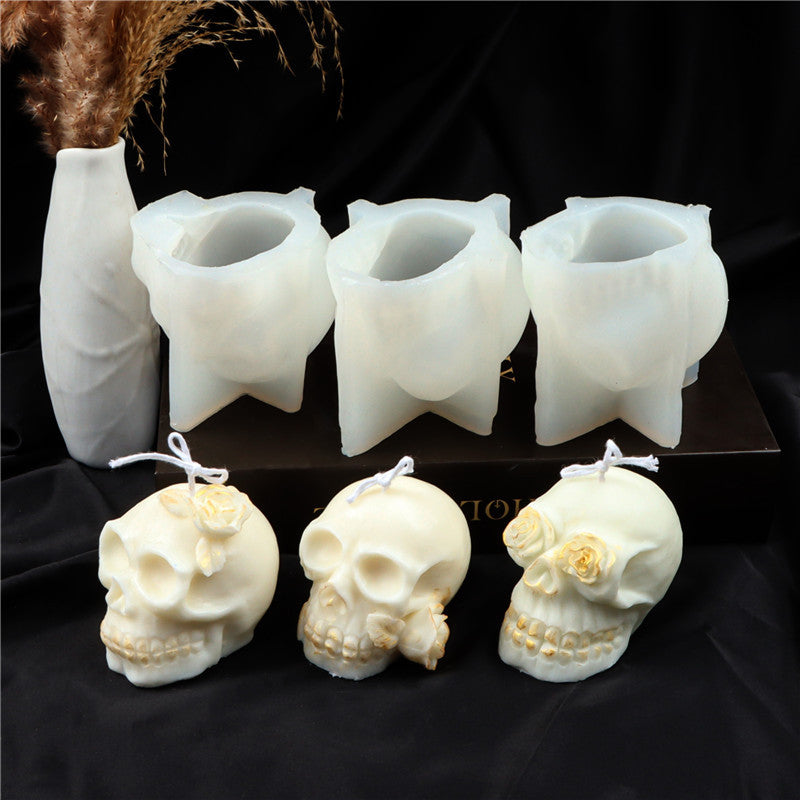


Make a Halloween centerpiece with real character instead of another forgettable candle. This flexible silicone skull mold transfers defined teeth, eye sockets, cheekbones, and decorative details into candles, soaps, mousse, and compatible castings.
Read the full descriptionMake a Halloween centerpiece with real character instead of another forgettable candle. This flexible silicone skull mold transfers defined teeth, eye sockets, cheekbones, and decorative details into candles, soaps, mousse, and compatible castings.
Make distinctive, detailed skull candles and handmade creations for Halloween and gothic-inspired décor.
Skip the tedious sculpting and create skull candles with crisp teeth, eye sockets, and cheekbones. Pour, release, and style distinctive Halloween or gothic décor in less time.
The cavity includes defined eye sockets, teeth, cheekbones, and a clean skull silhouette, so the finished piece reads clearly from across a display.

The soft silicone construction lets you ease finished wax, soap, or compatible casting material from the detailed cavity without rigid pulling.

The integrated wick opening supports a straightforward candle-making workflow, from positioning the wick to filling and setting the wax.

Multiple skull designs plus bow and floral details let makers create seasonal pieces that feel personal rather than mass-produced.
Gather compatible wax or soap base, a wick for candles, color or fragrance if wanted, and a protected level workspace.
Place the wick through the integrated opening and keep it centered before adding your material.
Fill the cavity steadily so the material reaches the teeth, sockets, cheekbones, and decorative relief.
Wait until the wax, soap, mousse, or compatible casting material is fully firm throughout.
Ease the silicone away gradually, releasing one section at a time instead of pulling hard on the finished details.
Soft translucent silicone mold with a detailed skull cavity and integrated wick opening.
Choose a material suited to your intended project.
Needed for candle making and positioned through the mold opening.
Personalize the finished skull with scent, color, floral touches, bows, or metallic detail.
Plain candles can make a Halloween shelf feel forgettable. Hand-sculpting teeth, eye sockets, and cheekbones takes patience, tools, and plenty of tiny corrections before the skull looks intentional.
The flexible silicone cavity puts the important relief into the pour from the start. Teeth, sockets, cheekbones, and the skull silhouette appear without a long sculpting session.
Change the wax color, add fragrance, or pick out the raised details with metallic accents. Floral touches and bow embellishments give the same gothic form a completely different mood.
Demold a recognizable skull that earns its place on a mantel, gift table, or craft-fair display. Pair it with anatomical skull decor for a gothic arrangement with real personality.
Remove residue with a gentle material-appropriate cleaning method.
Take extra care around teeth, sockets, cheekbones, and decorative recesses.
Let the mold dry completely before putting it away.
Keep the silicone protected from sharp tools and unnecessary folding.
Choose the larger variants for a display centerpiece or the compact variant for smaller arrangements.
| Silicone Skull Mold | Generic Candle | Hand Sculpting | |
|---|---|---|---|
| Defined facial relief | Yes | Partial | Yes |
| Repeatable skull shape | Yes | Yes | Partial |
| Decorative design options | Yes | Partial | Yes |
| Manual facial shaping | No | No | Yes |
| Creative control over color and scent | Yes | No | Yes |
| Useful for repeat seasonal projects | Yes | Partial | Partial |
Yes. The cavity includes raised teeth, eye sockets, cheekbones, and a clean skull silhouette, so the facial character transfers during the pour instead of requiring hand-carving.
The integrated opening supports a straightforward wick setup. Choose a wick suited to your wax and candle size, then keep it centered before pouring.
The mold works for compatible soap, mousse, and resin materials as well as candle wax. Confirm that your chosen material is suitable for silicone and for the intended finished use.
The soft silicone flexes around the cast, making release easier than pulling a rigid mold. Let the material set fully, then work slowly around the facial relief.
Use a gentle cleaning method suited to the material you used, take care around the deeper details, dry the mold fully, and store it away from sharp tools.
Yes. The mold removes the hardest sculpting work from the process. Beginners still need to manage wax temperature, wick placement, setting time, and careful demolding.


 Silicone Skull Candle Mold for Detailed Gothic Candles